
Preparing Your File
To ensure a smooth upload, format your file using these guidelines:
-
Each row should represent one individual record, such as a respondent, review, or feedback entry.
-
The first row must contain column headers (i.e., the names of the variables or questions).

💡Tip: If your file contains more than one header row (e.g., the first row with variable names, the second with descriptions), we recommend merging them into one row or removing the extra row before uploading.
Accepted formats: .xls, .xlsx, .csv, .txt, .spss, .sav
Identifying Text Columns
To prepare your data for AI analysis, it's essential to correctly identify the main text column and any auxiliary fields in your file.
Main Text Column (TTA):
The main text column, or Text to Analyze (TTA), is where Caplena applies its AI analysis. It should contain open-ended responses such as customer feedback, survey comments, or reviews.
In the example screenshot above, the green-highlighted column labeled "Reason for Rating" is a TTA column.
Caplena supports analyzing up to 25 open-text columns per project. Each one will be treated individually during analysis, so you don't need to create separate projects for each question.
💡 Tip: Keep each text column clear and focused. Avoid combining unrelated responses unless they logically belong together.
Oher Columns:
Other columns provide context but are not analyzed by AI. These columns are optional but highly recommended to enrich your analysis.
Typical columns include:
-
Metadata: age, gender, customer segment, region
-
Identifiers: response ID, user ID
-
Closed-ended responses: NPS score, star ratings, yes/no answers
You can use these fields to:
-
Segment responses by specific groups
-
Filter feedback during fine-tuning or reporting
💡 No extra cost: You're only billed for text columns, not auxiliary data.
Working with Dates
Include a date column if you'd like to filter or trend results by time.
Supported formats:
-
YYYY-MM-DD(e.g., 2022-01-30) -
DD.MM.YYYY(e.g., 30.01.2022) -
DD/MM/YYYY(e.g., 30/01/2022)
US-style dates (MM/DD/YYYY) are not supported. Please convert them to a day-first format before uploading.
Caplena automatically converts valid formats to ISO (YYYY-MM-DD) and supports timestamps (e.g., 2022-01-30 14:35:00).
Merging Multiple Columns
Follow these steps:
-
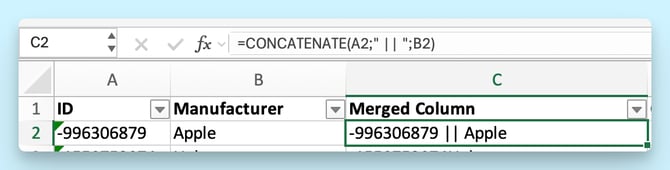
Use Excel Function for Merging: Utilize the Excel function =CONCATENATE(A2;B2), which merges the content of two cells into one.
-
Include a Dividing Character: To distinguish content sources, include a dividing character. For example, use =CONCATENATE(A2;" || ";B2), where the two pipe symbols (||) act as indicators for content origin.
- Add All Columns to Merge: Ensure you add all the cells you'd like to merge using the concatenate function.
By consolidating information before uploading it to Caplena, you'll streamline the analysis process, making it more effective across all your fully open projects.
Uploading Your File
Choose your file by:
-
Dragging and dropping into the upload box, or
-
Clicking to browse your device.

Caplena will guide you through the next steps automatically.
Finalizing Your Data Setup
After uploading your file, Caplena will take you to the Organize Your Data screen. This step ensures everything is correctly configured before analysis begins.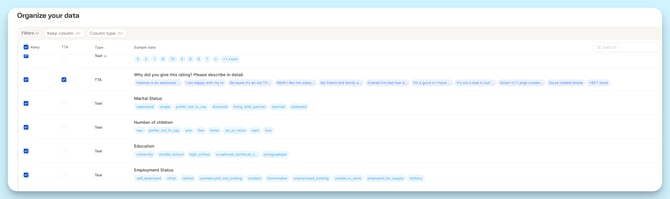
1️⃣ Select the Right Columns
Use the checkboxes to select which columns should be included in your project. You can also use the filter bar to quickly find specific columns in larger datasets.
💡 Make sure your main text column (TTA) is selected; this is required for AI analysis.
2️⃣ Understand Column Types
Each column is automatically detected and categorized by type:
-
TTA (Text to Analyze): The main open-text field(s) Caplena will analyze
-
Text Columns: Auxiliary fields used for filtering, like age or region
-
Date Columns: Used for time-based filtering or trend analysis
-
Numerical Columns: For numeric data such as employee count or survey wave
💡 You can toggle columns on or off depending on what you need.
3️⃣ Preview Your Data
Check the sample data shown for each column to ensure everything looks correct, especially the formatting of dates and values.
4️⃣ Finalize Your Setup
Once you're satisfied with the setup:
-
Click Validate to confirm and continue
-
Click Back to re-upload your file if something’s wrong
-
Click Cancel to exit without saving changes
